
Epoxy Tile Grout
DESCRIPTION:
AT-EPOXY TILE GROUT is hygienic, hard-wearing, impervious, epoxide resin-based ceramic tile grout with a high degree of resistance to chemical attack, abrasion and impact. The cured grout does not transfer taints to foodstuffs, does not permit the entry of bacteria or dirt and is easily maintained in a sterile condition.
STANDARDS:
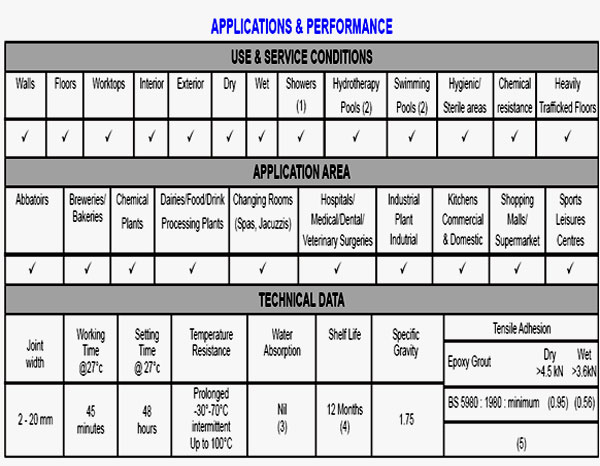
- AT-EPOXY TILE GROUT meets requirements of British Standard BS. 5980 : 1980 minimum for resistance to mould growth. It also conforms to BS 5385 : Part 4 : 1992, section 9, for use in sterile conditions. The product additionally meets the requirements of “The Materials and Articles in Contact with Food Regulations 1987”. “The Food Safety (General Food Hygiene) Regulations 1970 and the 1993 EC Directive on the Hygiene of food stuffs”.
COLOURS:
- AT-EPOXY TILE GROUT is available in the following colours WHITE, IVORY, CREAM, YELLOW, GREY, DARK GREY, BLUE, BLACK
BACKGROUND PREPARATION:
- FIXING THE TILES
- It is essential that the tiles used are appropriate for the service conditions and are fixed in the correct manner.
- APPLICATION PROCEDURE
- Before commencing grouting the adhesive bed must be set. It is essential that the tiles used are appropriate for the service conditions and are fixed in a solid bed of adhesive i.e. ensuring that, as far as possible, no voids are left behind / beneath the tiles. Refer to the relevant product data sheet for setting / drying times.
- Protect open joints from contamination and ensure that they are clean, dry and free from loose debris prior to grouting.
- MOVEMENT JOINTS
- These should be provided in accordance with BS 5385 : part 1-5 and may be filled with the appropriate flexible sealant. Intermediate floor joints should be reinforced with brass or stainless steel. Use stainless steel where hygiene is essential.
- Do not use in damp conditions
SITEWORK INSTRUCTIONS:
- Shake the bottle of COMP.B and stir the COMP.A prior to mixing
- Add all the COMP.B to all the COMP.A in a suitable, clean container and thoroughly mix together.
- If an electric drill mixer is used, blend on a slow speed (less than 300 rpm)
- Slowly add full quantity of COMP.C into the previous mix without any delay, mixing thoroughly until all the powder is dispersed and a uniform colour is achieved. Avoid entraining air by mixing at too high a speed or by over mixing.
- A stiffer consistency (more filler) will be required to “stop”: open – ended joints or to grout skirting tiles (refer to table).
- Filler content may be adjusted for smooth or rough surface finish and temperature during application.
- Moreover, generally more filler will be required for walls than floors.
APPLICATION
- Whilst the risk of tainting food is very low, it is still important to physically segregate adjacent food preparation areas which are to be operating during the grouting process. Ensure adequate ventilation in working areas.
- Using a hard rubber grout float, compact the grout into the joints ensuring that they are completely filled. Work in small areas and remove as much excess from the tile surface as possible. Strike off excess materials diagonally to the grout lines.
- Plug open-ended joints with the stiffer mix to prevent any slumping of the grout joints from occurring.
- Within 30 minutes of application, clean off surplus grout. Use a EMULSIFYING PAD & GRIPPER dampened with clean water to break down (emulsify) the grout residue. Use a circular motion and keep the pad and gripper flat relative to the tile surface to achieve a flush joint. Warm water, although not essential will greatly ease the emulsification process. Do not allow water to flow/run into ungrouted joints.
- Clean off the emulsified epoxy/water residue with a fine sponge, taking care not to drag grout from the joints. Clean diagonally to the grout lines.
- Any light haze remaining on the tile surface can be cleaned off the next day using the EMULSIFYING PAD & GRIPPER and an alkaline detergent.
- Do not allow the haze to remain on the surface for any longer than 24 hours.
NOTE: Care should be taken to avoid staining tiles when grouting. This is especially applicable when grouting unglazed floor tiles, quarry tiles, and tiles with a matt, glaze or textured surface. Check the potential risk of staining by applying the grout to a few tiles in a small trial area. PROTECTION (FOOD PROCESSING PREPARATION / STORAGE AREAS): Tiles/mosaics to be kept dry and not brought into service until the epoxy grout has cured and is hard. Contact between food and tiling should be avoided for at least 7 days. Not recommend for grouting tiles with metal decor or luster.
COVERAGE:
- Use formula (Theoretical)
{(TILE LENGTH+TILE BREADTH) X TILE THICKNESS X JOINT WIDTH X SPECIFIC GRAVITY} / {(TILE LENGTH + JOINT WIDTH) X (TILE BREADTH + JOINT WIDTH)} = KG/M2
PACKAGING & STORAGE:
- AT- EPOXY TILE GROUT is available in the following pack:
- 1 kg kit (FILLER 0.7 kg + RESIN 0.2 kg + HARDNER 0.1 kg)
- 5 kg kit (FILLER 3.5 kg + RESIN 1.0 kg + HARDNER 0.5 kg)
- Shelf life is 12 months in sealed containers as provided
- Keep containers sealed and away from heat and cold in a well ventilated area
HEALTH & SAFETY:
- Protect hands with rubber gloves and eyes with goggles.
- Accidental splashes to the skin or eyes must be rinsed immediately with clean water.
- Store in well-labeled containers.
- If required get medical attention.